|
|
Frank Kulick's
|
|
|
Frank Kulick's
|
|
Recovered from the original website at http://www.battlebelow.com/notdc.htm via the internet archive |
|
Once again the Master of Fire Control, that Wizard of the TDC - Frank Kulick has developed yet another way to get your torpedoes to hit what you're aiming at. . . . and this one uses neither the manual or automatic TDC modes. In fact it doesn't use the TDC at all. Here's why: There are many virtual skippers who tackle Silent Hunter from the historical purist's point of view. More then a few of them are involved with the Pacific Thunder Campaign. Many of those, myself included, have an affinity for the S-Boats due in part because there is somewhat of a David and Goliath story regarding these old, broken down, barely able to operate pigboats that lends themselves to being a fascinating study of US Naval fortitude. Fire Control aboard the sugar boats was more of an exercise in geometry and mathematics then it was in it's use of the latest technological equipment. The vast majority of the S-Boats had no TDC to use, so the FC party relied on a plot, an "is was", slide rules, protractors, dividers and other tools of navigation. Due to the fact that the Pacific Thunder Campaign is a virtual recreation of the submarine war, we tend be sticklers for historical accuracy. Knowing that the S-Boats had no TDC, to utilize it during the course of the campaign would have been contrary to PTC's goals. Having been reminded that the S-Boat's lacked a TDC, Frank set out to solve that problem for the virtual sugar boat sailors. For those with a background in navigation, the term DEAD RECKONING will be very familiar . . . although not having used DR myself in quite some time, I have to admit that I broke out a few of Uncle Sam's ol' training manuals again. In any case, Frank's DR fire control system is NOT for the squeamish but if you're up for a real challenge, take a crack at it. It works like a charm although it'll take a little practice - okay, it'll take a LOT of practice - but I can guarantee that you'll garner a whole new respect for those guys who took the war to Japan during the early years of WW II in a S-Boat. |
OK, put on your thinking cap for this one! This is not for the faint of heart, but for those interested in how to conduct an attack without a TDC. You will see how difficult it was for the Submarine crews to conduct this type of attack with an S, R, K, L, A Class submarine before the invention of that wonderful and often neglected device known as the MK-1 Torpedo Data Computer.
The tools you will need to do this are a pair of dividers; clear protractor, plain paper to establish firing point on, a slide rule or calculator, (The calculator is the Electronic Weapons officer, goes with the games Electronic Engineer!), and a cup of coffee.
Start by understanding and memorizing this formula; Speed X 100 = distance traveled in 3 minutes (in yds). Example; A ship travelling at 5 kts will move 500yds in three minutes. This can be broken down to the minute and say it travels 166 yds per minute, or roughly one hull length in one minute. This formula is applied throughout the attack and approach, and is applicable to all moving objects in and out of the game. It will give you a good solution that will result in torpedo impact/target destruction.
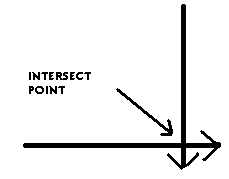
Lets start with track intersection. It is the point at which if you drew straight lines from your track (path) to the target track (path) the lines would cross/intersect. This can be at nearly any angle, but for beginners (myself included), establish a 90-d track. That means that the angle between his and your track is 90 degrees. Just to make sure you understand; say you are on course 090, and he is on course 180. The torpedo track would be called a STBD 90. Track intersect is 90-STBD because that is the side of his hull you see. Always use the angle both you and your target share. Your track is important because this is the torpedo’s track too! This intersect point is going to be a collision point, your fish his hull!
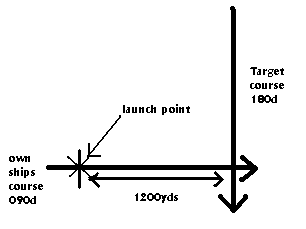
Now lets talk launch point. Using the MK-10 torpedo which travels at 36 knots. 3600 yards in 3 minutes, or 1200 in 1 min, We will use a 1200yard-launch point, meaning; that at 1200yds from intersect point, when the bow of the boat is touching that point; I launch my torpedo’s, and 60 seconds later they will reach the intersect point.
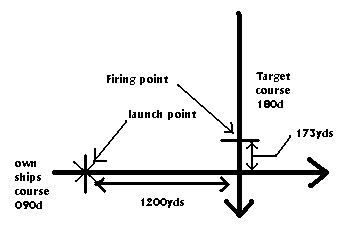
Now, in the scenario you will note that you are on course 090 and the target ship is on course 180 speed 5.3kts. To get at the launch point you use the rule of speed X 100 = distance traveled in three minutes to adjust your speed as necessary to get at the launch point at the right time. Using the Chart mode and waypoint feature to “draw these lines” is how I initially learned.
What and where is the right time? You must know the Targets speed and track. This is the killer! Determining that from the periscope is tough, not impossible. The most historically accurate way to do this is by making a plot, and tracking the target. That is covered in PART 2. For the sake of ease <grin> We will use the chart mode in the game to plot tracks, launch points, and firing points. Simply click the waypoint button, and place lines like the above drawings directly over the target and your boat to show intersect point. Then using a pair of dividers, center your self over the plot scale (to avoid parallax) and set your dividers to 1200 yards. The 1370yd scale is not divided very well, each increment is equal to 68.5 yards! Use YOUR judgement, it’s your shot! Next, using the waypoint feature and your dividers, mark the 1200-yard launch point like the above drawing. A dot will do, the X is there for illustration. Next, is the targets speed/firing point. Putting the mouse cursor over the target will tell you it’s speed, or use any other method to obtain that figure. Using the formula for distance traveled in three minutes, establish how far the target will travel in one minute (the same time of your 1200yard-torpedo run) With a speed of 5.2 kts, the target will travel 173 yards in that same 60 seconds your torpedo is travelling 1200. Using the waypoint feature, and your dividers, place a dot up his track away from the intersect point. That is where he has to be at when you let your torpedo’s fly.
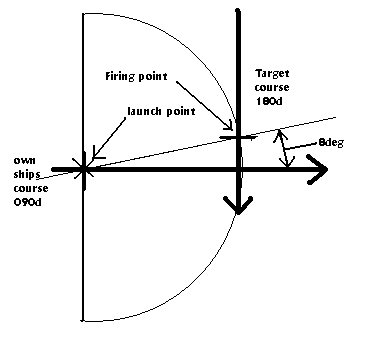
Now it is up to you, again, to decide how much realism you want to go for. You can leave your periscope up and when the targets bow makes contact with the firing point dot and your bow touches the launch point dot let your fish fly at 3-5 second intervals. The other method, a little more realistic and better spread of the fish, is to transfer all this data to a piece of paper. Make sure you are using the same scale that you used on the chart screen, 1370yds! Once all that is down, take your protractor, and read the degrees off zero that the firing point is from own ships track.
Then in this case it’s 8 degrees off the ships head, or 352d relative. Using this information, when you are at launch point, and the Maru is at firing point, shoot your torpedo’s at the fwd mast, MOT, and aft mast! Another bit of realism to add is using the simulators time to time your shots. How to do this is simply <smile> figuring out at what time the target will be at the firing point, and adjusting your speed to arrive at the launch point at the same time. Hopefully, when you raise your scope, and train it to 352dR the maru will be where he is supposed to be. Lastly, I am sure that you have wondered if you could shoot using sonar? Well, if you draw with the waypoint markers a line crossing the launch point and the firing point as illustrated above, zoom in to the 1370-yard scale. When the maru is within sonar range you’ll notice a gray line tracking the Maru. When the gray line and the line crossing the launch point and the firing point match, shoot in 3-5 second intervals. Good luck and good hunting.
Ok, put on your extra strong thinking cap for this one! This is really not for those with medical conditions! (kidding) Those interested in how to conduct an attack without a TDC, and without the use of the Chart mode in Silent Hunter. You will learn how difficult it was for the Submarine crews to conduct this type of attack with an S, R, K, L, A Class submarine before the invention of that wonderful and often neglected device known as the MK-1 Torpedo Data Computer. Any submarine during the war that had its TDC go down from damage, or technical problems, would have to resort to this method, as it’s primary solution. Believe it or not, it is still in use today as a backup to all that multimillion-dollar fire control system!
The tools you will need to do this are a pair of dividers, clear protractor, some type of plotting board big enough to work out to 10kyds(about 24” X 24”, or the dining room table. Just don’t stab the table with the dividers and blame me!). Plain white paper big enough to cover your entire board, 3-4 sharp #2 pencils, and masking tape. A slide rule or calculator, (The calculator is the Electronic Weapons officer, goes with the games Electronic Engineer!), an 18” or larger ruler (straight edge), and a pot of coffee.
Lets start with getting you set up. Cover your board with paper. It is your choice what “scale” you want to use, any is fine. Even metric, and possibly easier to divide the yards! I used inches; IE: 1” = 1000 yards small scale for long range tracking. 4” = 100O yards large scale for close range tracking. The plus is that your scale is right on the ruler, just remember what range scale you are using!
When you are ready to start tracking, draw a straight line pointing any way representing your track in a location on your board so that you and the maru will move across the paper for a while! Using the clock in SH, pick an even time (1203, 1709, and 0126), and place a dot on that line. Write your speed, course, time you placed the dot, and in exactly three minutes, place another mark for how far you have traveled using the speed X 100 = distance traveled in 3 min. If you are doing 10 knots exactly, than in 3 minutes you will have traveled 1000 yards, or 1 inch in small scale. See where this is going? SH makes this easy because there is no drifting off course! REMEMBER; consistent speed is critical, radical speed changes will hose your plot beyond repair! But if you need to change course and speed, which is expected to get into a good spot, simply re-start the plot with the new course and speed.
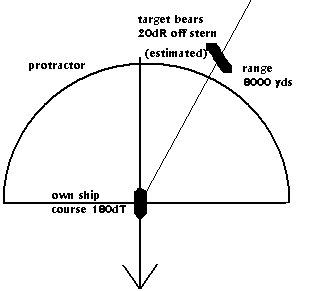
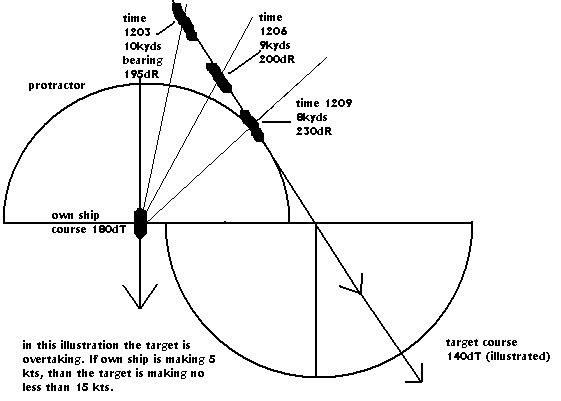
As important, is to establish the targets track, speed, and range. I suggest coming to a parallel course (or close-look at the Angle on the bow to get an approximation). Track and keep a good plot of where he is and what he is doing. This will help you decide when and where to attack. This may take as long as 60 minutes to get a good feel for his course, speed and track. The further out he is, the poorer the data. Every three minutes using the periscope mark his bearing and range. Use relative bearings from your boat using the protractor to transfer the bearings to lines and on that line place a dot at the estimated range 3 minutes. (If he is behind you, place the protractor’s center degree axis on your position dot, and mark the degrees off your stern (180), if forward (0), reverse the process. The protractor represents 180 degrees of relative bearings from the center of your boat.). Once you have 3 dots plotted. Draw a light line across the three dots and you have his track, and speed (maybe/almost). To get an estimate of his speed, take the dividers, and put it in the first dot, to the second (the distance traveled in 3 min), then check it against the scale. If you were 9kyds directly abeam, you could get a real good speed estimate! The range rate is another means of checking his speed when he is ahead or astern. If he is opening, then you are faster than he is, if closing you are slower, and so forth. The longer you track the better your solution. Remember your position and his must be plotted consistently. Should you miss a 3-min mark, don’t panic, but get the next one. I will mention that your speed calculations will vary a bit because they are affected by the accuracy of your ranging. Remember bearing rate? The closer the faster, farther slower. Your speed determination will be affected if your ranges are way off. Good bearings and good ranging will give you an excellent course, track and speed determination.
Once you have all this, you can carry his course (track) out to a point where you can conduct your attack. Should you have to turn to adjust your course, shoot a bearing, range and begin the turn. Turn at a 3-minute point. You can even break off as long as you have carried his track out, and continue plotting your position. You could DR him into the next day if you like. Now all the data from Part 1 comes into play. You then cut in, slow down and work your way to the calculated launch point, firing point, and intersect point. If your plot is large enough, you can pre plan what time and where all this will take place off his track data, and your position DR’d.
That would take practice, patience and skill, all the good qualities of a Submarine Captain!
For those really looking for a challenge, DR your entire patrol off Jerry’s Charts (see links below)! Once a day, weather permitting, use the chart mode to “get a fix”, and then back out not returning until the next day. Cloudy overcast skies-NO FIXES! Just make sure that you use the charts scale, what ever it is!